
WordPress is one of the most popular and versatile platforms for creating websites, blogs, and online stores. In this blog post, we will show you how to create an online store using WordPress in a few simple steps.
Step 1: Choose a Domain Name and Hosting Service
The first step to create an online store using WordPress is to choose a domain name and a hosting service. A domain name is the address of your website on the internet, such as www.example.com. A hosting service is the company that provides the space and resources for your website to run online.
There are many domain name registrars and hosting services available, but we recommend using Bluehost, which is one of the official WordPress partners. Bluehost offers a free domain name, a free SSL certificate, and a one-click WordPress installation for a low monthly fee.
To get started, go to Bluehost.com and click on the “Get Started” button. You will see a list of plans to choose from, depending on your needs and budget. We recommend choosing the Plus plan, which gives you unlimited websites, storage, bandwidth, and email accounts.
Next, you will be asked to enter your domain name. You can either use an existing domain name that you own, or register a new one for free. If the domain name you want is available, you will see a confirmation message. If not, you will see some suggestions for alternative names.
After choosing your domain name, you will need to fill out your account information, such as your name, email address, and payment details. You will also see some optional extras that you can add to your plan, such as domain privacy protection, site backup, and SEO tools. You can skip these if you want to save some money, or add them if you think they are useful for your online store.
Once you complete your payment, you will receive an email with instructions on how to access your Bluehost account and install WordPress.
Step 2: Install WordPress and WooCommerce
The next step to create an online store using WordPress is to install WordPress and WooCommerce. WordPress is the software that powers your website, and WooCommerce is the plugin that adds e-commerce functionality to it.
To install WordPress, log in to your Bluehost account and go to the “My Sites” section. Click on the “Create Site” button and follow the wizard. You will need to enter some basic information about your site, such as the site name, tagline, username, and password. You can change these later if you want.
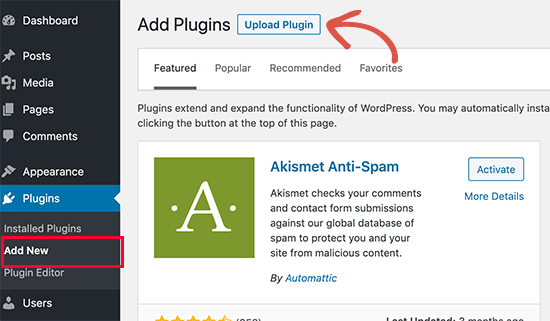
After creating your site, you will see a dashboard where you can manage your site settings, themes, plugins, and more. To install WooCommerce, go to the “Plugins” section and click on the “Add New” button. Search for “WooCommerce” in the search box and click on the “Install Now” button next to it. After installing it, click on the “Activate” button to activate it.
You will then see a welcome screen where you can start setting up your online store. You can either follow the setup wizard or skip it and do it manually later. The setup wizard will guide you through some basic steps, such as choosing your store location, currency, payment methods, shipping options, tax rates, and more.
Step 3: Choose a Theme and Customize Your Store
The third step to create an online store using WordPress is to choose a theme and customize your store. A theme is the design and layout of your website that determines how it looks and feels. There are thousands of themes available for WordPress, both free and paid.
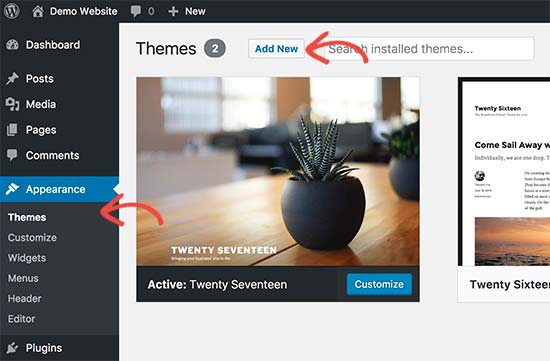
To choose a theme, go to the “Appearance” section and click on the “Themes” button. You will see some default themes that come with WordPress, as well as some recommended themes from Bluehost. You can also browse more themes by clicking on the “Add New” button or by visiting sites like ThemeForest or Elegant Themes.
Once you find a theme that you like, click on the “Install” button next to it and then on the “Activate” button to apply it to your site. You can then customize your theme by going to the “Customize” section under “Appearance”. Here you can change various aspects of your theme, such as colors, fonts, logos, menus, widgets, and more.
You can also use page builders like Elementor or Beaver Builder to create custom pages for your online store using drag-and-drop elements. These page builders are compatible with most themes and plugins and allow you to create stunning layouts without any coding skills.
Step 4: Add Products and Content to Your Store
The fourth step to create an online store using WordPress is to add products and content to your store. Products are the items that you sell on your online store, such as physical goods or digital downloads. Content is the information that you provide on your website, such as blog posts or pages.
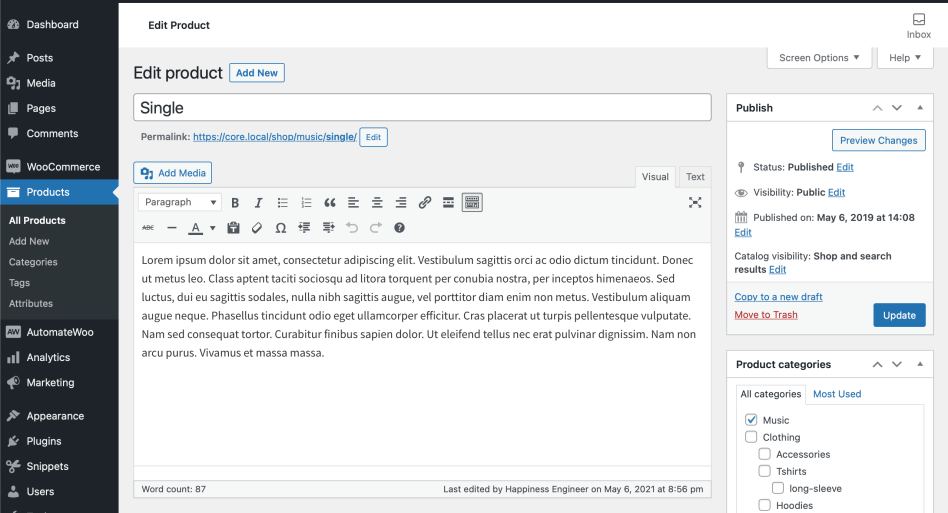
To add products to your store, go to the “Products” section and click on the “Add New” button. You will see a screen where you can enter the product name, description, price, inventory, shipping, and other details. You can also add product images, categories, tags, attributes, and variations.
To add content to your website, go to the “Posts” or “Pages” section and click on the “Add New” button. You will see a screen where you can enter the title, content, and other details of your post or page. You can also add images, videos, links, and other media using the WordPress editor or a page builder.
You can create different types of content for your online store, such as:
– A home page that showcases your products and brand
– An about page that tells your story and mission
– A contact page that allows your customers to reach you
– A blog that provides useful information and tips related to your niche
– A FAQ page that answers common questions and concerns of your customers
– A privacy policy page that explains how you handle your customers’ data
– A terms and conditions page that outlines the rules and regulations of your online store
Step 5: Promote and Grow Your Online Store
The final step to create an online store using WordPress is to promote and grow your online store. Promotion is the process of attracting and engaging potential customers to your online store. Growth is the process of increasing your sales and revenue from your online store.
There are many ways to promote and grow your online store, such as:
– SEO (Search Engine Optimization): This is the practice of optimizing your website for search engines like Google or Bing so that it ranks higher for relevant keywords and phrases. SEO involves improving your site speed, structure, content, links, and more.
– SMM (Social Media Marketing): This is the practice of using social media platforms like Facebook, Instagram, Twitter, or Pinterest to connect with your audience and share your products and content. SMM involves creating engaging posts, stories, videos, ads, and more.
– Email Marketing: This is the practice of using email to communicate with your customers and prospects and encourage them to buy from you. Email marketing involves building an email list, sending newsletters, offers, updates, and more.
– PPC (Pay-Per-Click) Advertising: This is the practice of paying for ads on search engines or social media platforms that direct traffic to your online store. PPC advertising involves creating compelling ads, choosing keywords or audiences, setting a budget and bid, and more.
– Influencer Marketing: This is the practice of collaborating with influencers who have a large and loyal following on social media or other platforms and who can endorse your products or content. Influencer marketing involves finding relevant influencers, reaching out to them, offering them incentives or compensation, and more.
These are some of the most common and effective ways to promote and grow your online store using WordPress. However, there are many other strategies that you can try depending on your niche, goals, budget, and creativity.
Conclusion
Creating an online store using WordPress is not as hard as it may seem. With the right tools and guidance, you can build a successful e-commerce website in no time.
In this blog post, we have shown you how to create an online store using WordPress in five simple steps:
1. Choose a domain name and hosting service
2. Install WordPress and WooCommerce
3. Choose a theme and customize your store
4. Add products and content to your store
5. Promote and grow your online store
We hope this blog post has been helpful and informative for you. If you have any questions or feedback, please feel free to leave a comment below.
Happy selling!
